Playwrightへ入門
公開日:2024-10-25
はじめに
-
社内テストやUATでは、ブラウザを通じたテストを行うことが多く、ブラウザでのテスト中に初めて気づく不具合や仕様の相違が発見されることも少なくない。しかし、これらのテストは手動で実施するため時間がかかり、結果としてコード修正が遅れることがある。そこで、ブラウザテストを自動化することで、ある程度の品質を確保できると考える。
-
Playwrightは、そのようなブラウザの自動テストを行うためのツールである。これまで個人的にはPuppeteerを使用していたが、今回はPlaywrightを試してみることにする。
Playwrightとは
- E2E テストツール。ブラウザでのテスト自動化が可能。
Quick Start
-
install
mkdir playwright_practice && cd playwright_practice # playwrightのinstall npm init playwright@latest # > npx # > create-playwright # # Getting started with writing end-to-end tests with Playwright: # Initializing project in '.' # ✔ Do you want to use TypeScript or JavaScript? · TypeScript # ✔ Where to put your end-to-end tests? · tests # ✔ Add a GitHub Actions workflow? (y/N) · true # ✔ Install Playwright browsers (can be done manually via 'npx playwright install')? (Y/n) · true # ✔ Install Playwright operating system dependencies (requires sudo / root - can be done manually via # 'sudo npx playwright install-deps')? (y/N) · true # システムの依存関係をインストール npx playwright install-deps npx playwright install msedge npx playwright install chrome -
テストの実行
example.spec.tsを見ると下記のように、has title,get started linkのテストが記述されており、それが実行される。
import { test, expect } from "@playwright/test"; test("has title", async ({ page }) => { await page.goto("https://playwright.dev/"); // Expect a title "to contain" a substring. await expect(page).toHaveTitle(/Playwright/); }); test("get started link", async ({ page }) => { await page.goto("https://playwright.dev/"); // Click the get started link. await page.getByRole("link", { name: "Get started" }).click(); // Expects page to have a heading with the name of Installation. await expect(page.getByRole("heading", { name: "Installation" })).toBeVisible(); });playwright.config.tsにプロジェクトを設定することで、複数のブラウザでテストを実行できる。今回は下記の3つのブラウザでテストを実行する。
projects: [
    {
    name: 'chromium',
    use: { ...devices['Desktop Chrome'] },
    },

    {
    name: 'firefox',
    use: { ...devices['Desktop Firefox'] },
    },

    {
    name: 'webkit',
    use: { ...devices['Desktop Safari'] },
    },
# テストを実行 npx playwright test # Running 6 tests using 6 workers # 6 passed (3.1s) # # To open last HTML report run: # # npx playwright show-report -
テストレポートを表示
- http://localhost:9323 にアクセスすると、テスト結果が表示されることが確認できる。
# テストレポートを表示
npx playwright show-report
-
UIモードでテストを実行
- 下記画面が起動して、指定したブラウザで指定したテストを手動で実行することができる。
npx playwright test --ui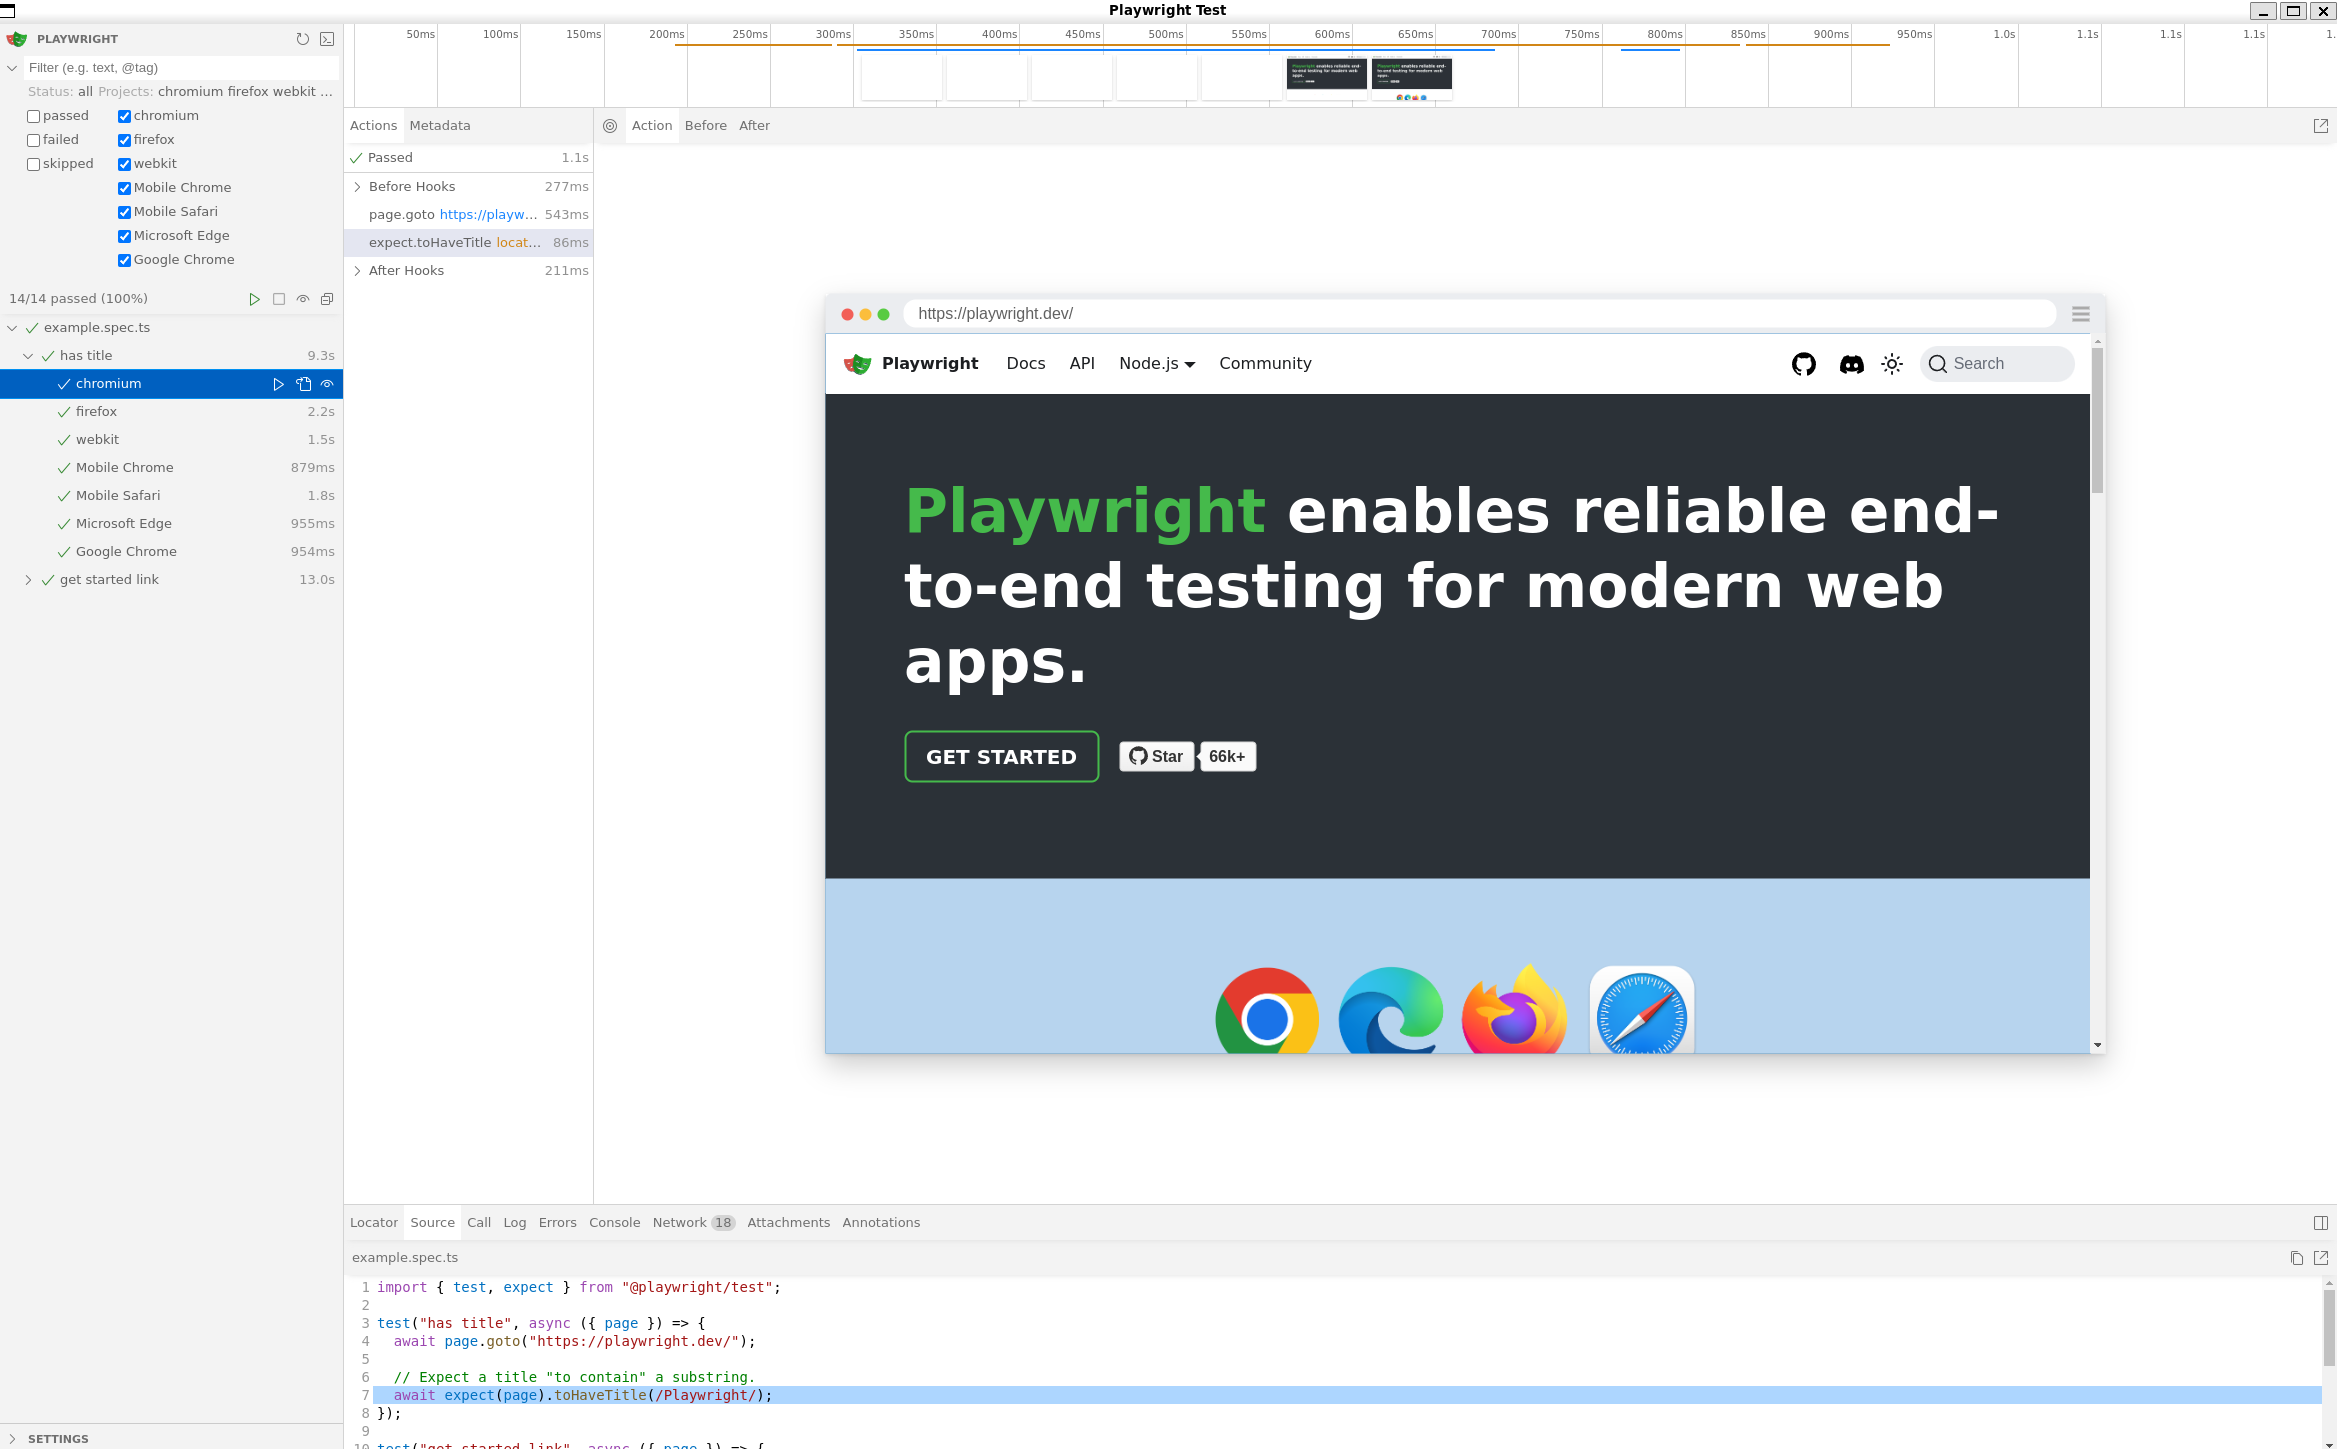
-
headedモードでテストを実行
- Playwrightがウェブサイトとどのように相互作用するかを視覚的に見ることができる
npx playwright test --headed -
ブラウザを指定してテストを実行
- 下記は、Google Chromeでテストを実行する例
npx playwright test --project "Google Chrome"
Generating tests
-
下記コマンドでURLを指定することで、操作しながら、テストコードを生成することができる。
npx playwright codegen itsme.senriy.dev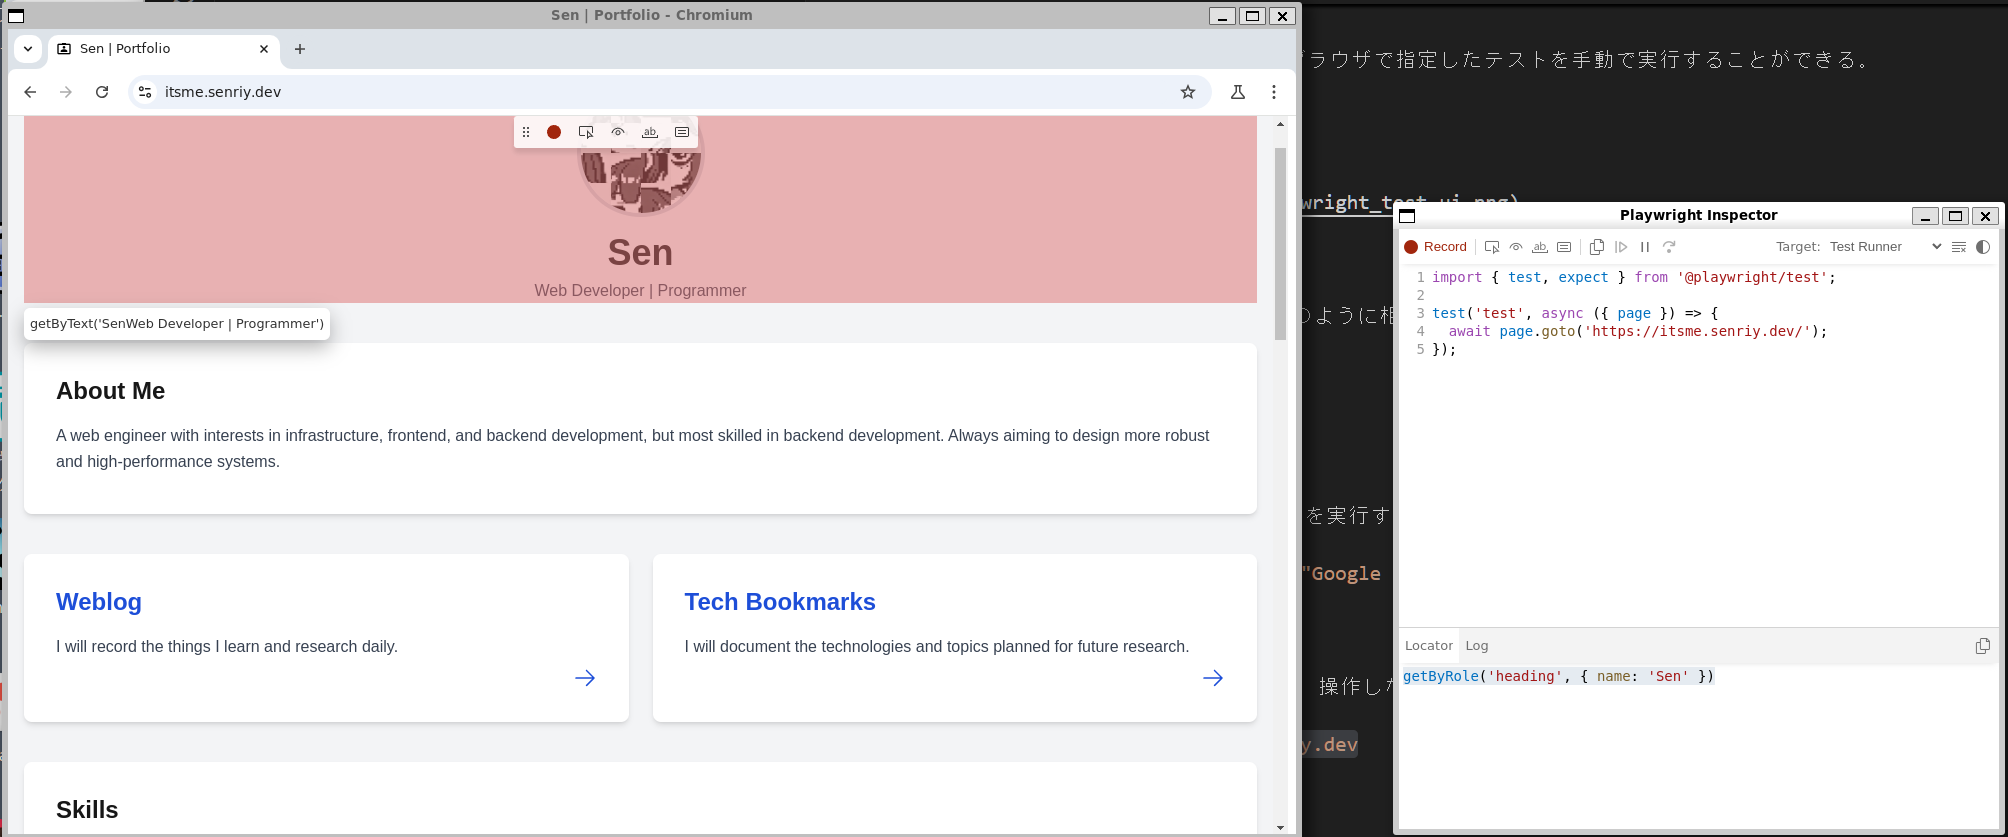
-
Recordボタン .. クリックしてからその操作がPlaywright inspectorのコードに反映される。 -
Pick locatorボタン .. クリックしてからその要素がPlaywright inspectorのLocatorに記録される。 -
Assert visibilityボタン .. toBeVisible()のアサーションがコードに反映される。 -
Assert textボタン .. toContainText()のアサーションがコードに反映される。 -
利用すると下記のようなコードを画面で操作しながら生成することができる。
test("Top Check 1", async ({ page }) => { await page.goto("https://itsme.senriy.dev/"); await expect(page.getByRole("heading", { name: "Sen" })).toBeVisible(); }); test("mdファイル Check 1", async ({ page }) => { await page.goto("https://itsme.senriy.dev/"); await page.getByRole("link", { name: "Weblog" }).click(); await page.getByRole("link", { name: "ポートフォリオを作成" }).click(); await expect(page.getByRole("heading", { name: "はじめに" })).toBeVisible(); }); -
設定ファイル と テストファイル
-
コアファイルは設定ファイルとテストファイルの2つである。
-
設定ファイル
playwright.config.ts- Config Reference で設定を確認できる。
- テストファイルのディレクトリやテストを並行で実施するかなどの設定ができる。
import { defineConfig, devices } from "@playwright/test"; export default defineConfig({ /* Directory where Playwright Test expects to find test files */ testDir: "./tests", /* Run tests in files in parallel */ fullyParallel: true, // テストファイルを並列で実行 /* Fail the build on CI if you accidentally left test.only in the source code. */ forbidOnly: !!process.env.CI, /* Retry on CI only */ retries: process.env.CI ? 2 : 0, /* Opt out of parallel tests on CI. */ workers: process.env.CI ? 1 : undefined, /* Reporter to use. See https://playwright.dev/docs/test-reporters */ reporter: "html", /* Shared settings for all the projects below. See https://playwright.dev/docs/api/class-testoptions. */ use: { /* Base URL to use in actions like `await page.goto('/')`. */ // baseURL: 'http://127.0.0.1:3000', /* Collect trace when retrying the failed test. See https://playwright.dev/docs/trace-viewer */ trace: "on-first-retry", }, /* Configure projects for major browsers */ projects: [ { name: "chromium", use: { ...devices["Desktop Chrome"] }, }, { name: "firefox", use: { ...devices["Desktop Firefox"] }, }, { name: "webkit", use: { ...devices["Desktop Safari"] }, }, { name: "Mobile Chrome", use: { ...devices["Pixel 5"] }, }, { name: "Mobile Safari", use: { ...devices["iPhone 12"] }, }, { name: "Microsoft Edge", use: { ...devices["Desktop Edge"], channel: "msedge" }, }, { name: "Google Chrome", use: { ...devices["Desktop Chrome"], channel: "chrome" }, }, ], }); -
テストファイル
example.spec.ts- 基本的に3ステップでテストが記載できる。
gotoでURLにアクセスgetByRoleなどの関数で要素を取得(Classesを参照)- その要素に対して、
clickやtoBeVisibleなどの関数を実行
import { test, expect } from "@playwright/test"; test("Top Check 1", async ({ page }) => { await page.goto("https://itsme.senriy.dev/"); await expect(page.getByRole("heading", { name: "Sen" })).toBeVisible(); }); test("mdファイル Check 1", async ({ page }) => { await page.goto("https://itsme.senriy.dev/"); await page.getByRole("link", { name: "Weblog" }).click(); await page.getByRole("link", { name: "ポートフォリオを作成" }).click(); await expect(page.getByRole("heading", { name: "はじめに" })).toBeVisible(); }); -
テストファイルの応用
demo-todo-app.spec.ts- 各テストの前に実行される
beforeEachフックを宣言できる - 下記のようにすれば、各テストで
gotoを省略可能。
test.beforeEach(async ({ page }) => { await page.goto('https://demo.playwright.dev/todomvc'); });- テストをグループ化することができる
test.describe('two tests', () => { test('one', async ({ page }) => { // ... }); test('two', async ({ page }) => { // ... }); }); - 各テストの前に実行される
GitHub Actionsでの自動テスト
- playwrightをinitする際に、Github Actionsを作成することができる。下記が自動で作成されたコード。
name: Playwright Tests
on:
push:
    branches: [ main, master ]
pull_request:
    branches: [ main, master ]
jobs:
test:
    timeout-minutes: 60
    runs-on: ubuntu-latest
    steps:
    - uses: actions/checkout@v4
    - uses: actions/setup-node@v4
    with:
        node-version: lts/*
    - name: Install dependencies
    run: npm ci
    - name: Install Playwright Browsers
    run: npx playwright install --with-deps
    - name: Run Playwright tests
    run: npx playwright test
    - uses: actions/upload-artifact@v4
    if: ${{ !cancelled() }}
    with:
        name: playwright-report
        path: playwright-report/
        retention-days: 30
まとめ
- 今回は、簡単にPlaywrightを使ってみた。
- Playwrightのドキュメントがしっかりまとまっており、使いやすい。
- テストコードの自動生成機能があるので、直感的に簡単なE2Eテストを記述できるところが入りやすくて良い。
- テストもコマンドで実行できるもの、UIモードで実行できるものとあり、使い分けができるのがデバッグに役に立つ。
- テスト結果のレポートは見やすい。
- getByRoleなどのLocatorsで指定する要素は、DOM要素名と異なるので、最初は調べながらかもしれないが、慣れれば問題ないと思う。(headingなど)
- テストの設定ファイルにて、複数のブラウザを指定できるのはPuppeteerとは違う点であり、非常に強力である。
- ReferenceにもGitHub Actionsの設定があるので、CI/CDに積極的な姿勢がモダンでアジリティ獲得につながると思う。